How to Install WordPress?
STEP 1. Download the WordPress installation package
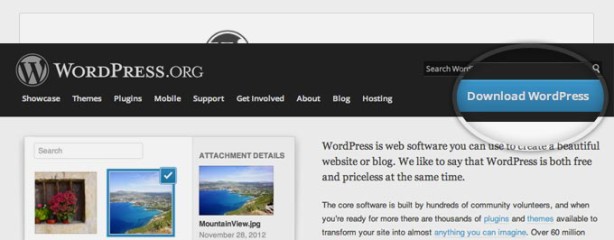
To start the installation process, first you need to download WordPress from it’s Official Download Page. We recommend that you always download and install the latest stable version of WordPress.
Once you click on the Download button for the latest WordPress version, the installation package will be saved to your hard disk. Locate the installation package that you’ve just downloaded and extract it to a new folder.
STEP 2. Upload the WordPress Files to Your Server
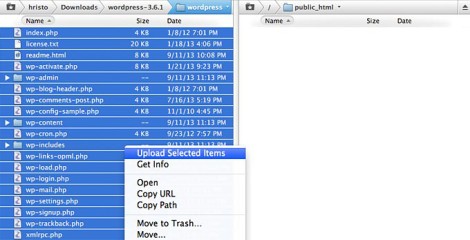
Now, you need to upload the extracted files and folders to your web server. The easiest way to upload the installation files is via FTP. Once the download is complete, extract the archive and upload it to your web hosting account. You can do that via FTP using a client application like Filezilla or via cPanel -> File Manager -> Upload file(s). If you want this WordPress installation to be main for your website, the files should reside in the public_html folder of your account. However, you can always make a subfolder (i.e. public_html/blog) if you want to run only part of your website on WordPress.
STEP 3. Create a MySQL Database for WordPress to use
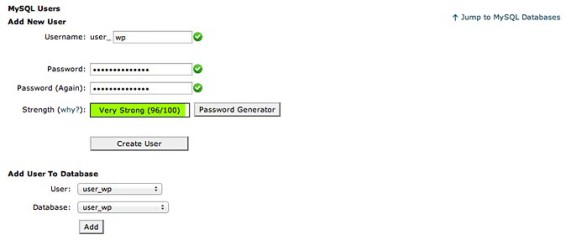
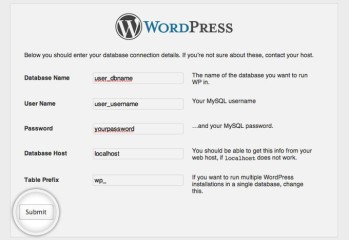
Now, you need to create a MySQL database and assign a user to it with full permissions. Once you create your MySQL Database and User, make sure you write down the database name, database username and password you’ve just created. You will need those for the installation process.
STEP 4. Go through the installation process
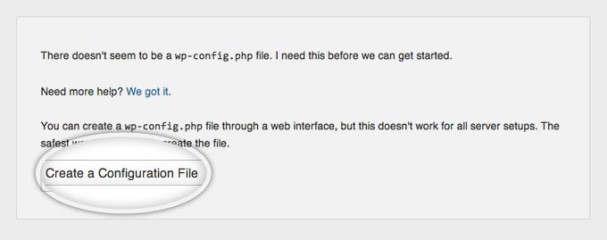
Now it’s time to navigate to your website to start with the installation process. If you have uploaded WordPress in your public_html directory you’ll need to go to http://yourdomain.com in your preferred browser. The first thing you will notice is a message, telling you that you don’t have a wp-config.php file and you should create one. Just click on the Create a Configuration File button to proceed.
On this page you will see a message, asking you to prepare the necessary information for the installation. Since we already have this information, simply press the Go! button.

Enter the details for your newly created MySQL database and press the Sumbit button
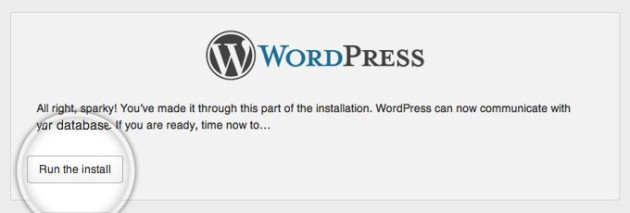
WordPress will now check if your settings are correct. If you have entered all the necessary information, you will see a confirmation screen. Press the Run the Install button to proceed.
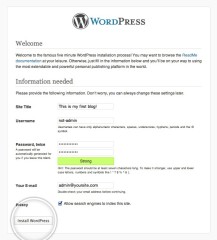
On the next screen you will have to enter the information about your administrative username and the title of your new site. In addition, you can specify whether you’d want search engines to index your site or not. Once you fill in that information, press the Install WordPress button. Bear in mind, however, that you should specify a real email address. It can be later used in case you forget your password.

Recent Posts
Threads adds flair tags for community posts
The themed icons show up under usernames and reflect specific subtopic interests within larger discussion groups. Threads has...
Google Business Profile Dashboard Showing No Reviews? The Issue Has Been Resolved
Some Business Profile dashboards show no reviews while the public listing still displays the review count. The reports point ...
Facebook Post View Counts: Everything You Need to Know
Meta already offers this metric on Instagram and Threads, and the company has repeatedly said this information offers a more ...
Google adds features to Video Reach and Video View campaigns
YouTube and Google Ads will get expanded metrics to help advertisers gain more insight into how their spending drives results...